WordPress is by far the most popular Content Management System (CMS) in the world, but it’s not 100% safe (nor is any other platform). Malicious attackers are always working on new ways to penetrate the system, which is why you need to learn how to protect your WordPress site.
In this case, WordPress’ popularity comes in handy. There are a wide variety of tools designed to help its users secure their sites from top to bottom. And as far as we’re concerned, Wordfence Security is one of the best options out there for anyone who just wants their WordPress site security taken care of.
In this article, we’ll dig into what makes Wordfence Security a good choice to protect your WordPress site. Then, we’ll guide you through the process of setting it up and configuring it properly, to make sure your site is safe.
Protect your WordPress site: Introducing the Wordfence Security plugin

Wordfence Security is one of the most full-featured WordPress security plugins available. It enables users to micromanage their site’s security from top to bottom, and even automate it, in the case of premium users. The sheer number of features the plugin offers can be overwhelming at first, but luckily for us, it comes with excellent documentation (and we’ll cover the basics in a minute).
Key features:
- Enables you to scan your WordPress site for vulnerabilities.
- Alerts you via email if any threats pop up.
- Supports advanced login security measures.
- Can automatically block IPs depending on suspicious activity.
Pros:
- The plugin’s free version packs all the features you need to secure your site.
- Supports automatic alerts for security threats.
- It’s entirely open-source.
Cons:
- Only premium users can schedule and automate security scans.
Price:
We’re using the Wordfence Security free version for the purposes of this tutorial. Licenses for the premium version start at $99 per year per site, and prices vary depending on how many licenses you purchase.
How to set up the Wordfence Security plugin (in 3 simple steps)
Before we begin configuring the Wordfence Security plugin, we need to get it set up. Once you’ve installed and activated the plugin, the following notification will appear on your dashboard:
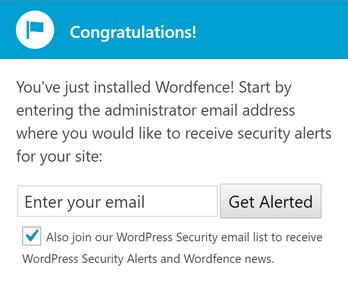
Enter your email in the corresponding field and click on Get Alerted. Then close the notification and head to the new Wordfence tab on your dashboard. We’re going to kick things off by setting up advanced login security measures.
Step #1: Set up login security measures
Let’s get started by clicking on Wordfence > Options and finding the Basic Options section. Underneath, locate and tick the box that says Enable login security:
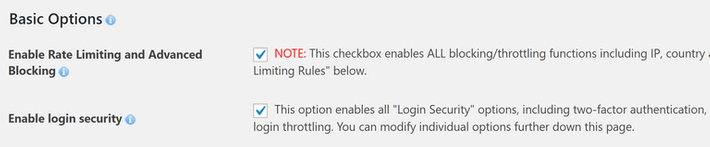
Doing so will enable all the plugin’s basic login security features, including Two-Factor Authentication (2FA), strong password requirements, and login limits.
With that taken care of, head further down until you reach the Login Security Options section:
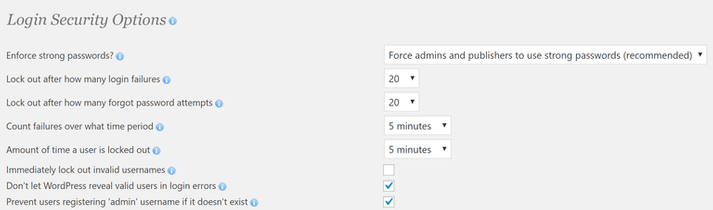
Wordfence Security’s default login options are quite solid – they force administrators and authors to use strong passwords, prevent the reveal of login errors, and block out users after too many login attempts.
The only option we’d change is how many attempts it takes before users are temporarily blocked, since 20 is too high (in our humble opinion). Going with a lower figure – like five attempts – better prevents brute forcing attempts. Once you’ve updated your settings, go to the bottom of the page and click on Save Changes.
Step #2: How to perform a site-wide scan
The Wordfence Scan function enables the plugin to take a look throughout your site to find any malicious code or patterns of infection. It’s essentially the same as using an antivirus application to scan your computer – you can use it to locate and patch existing vulnerabilities, but it’s always better to scan your site regularly, just in case.
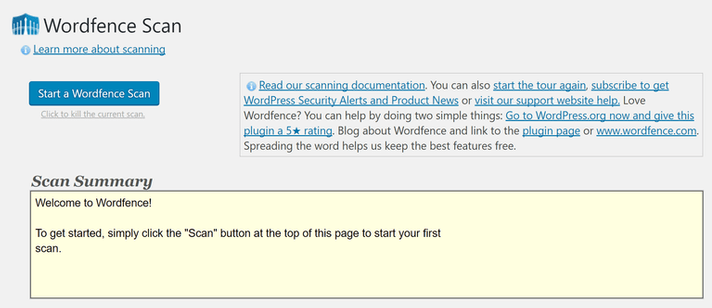
To use this feature, you need to go to Wordfence / Scan and click the Start a Wordfence Scan button at the top of the page:
The yellow boxes below will display both the progress and results of your scan as it moves along:
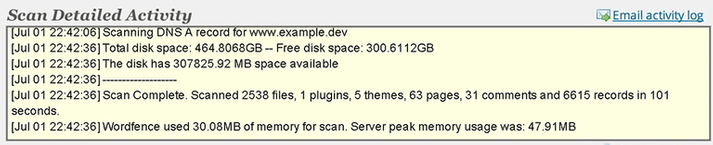
If the scan finds any vulnerability issues on your WordPress site, it will present you with the option to either delete or restore any infected files to their original version. What to do in this case is up to you, but be warned that deleting any critical files could potentially break your site. If you do find a vulnerability, in most cases restoring a clean backup might be the best course of action.
Step #3: How to set up security alerts
At the beginning of this section, we guided you through the process of entering your email to receive security alerts from Wordfence Security. When configured to do so, the plugin can send you notifications for several security issues, ranging from automatic IP blocks to login lockouts. Go to Wordfence / Options and scroll down until you find the Alerts section:
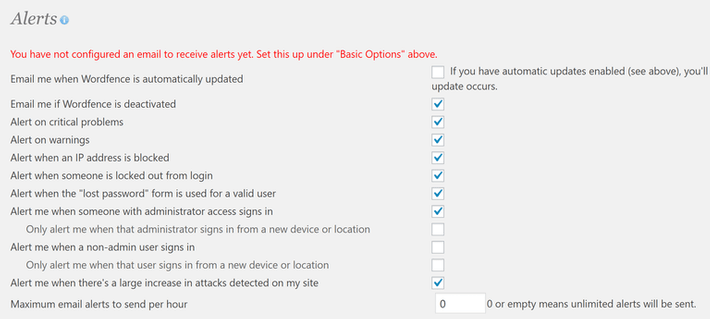
Most of the default options seen above are excellent from a security standpoint, but others can get a bit annoying if you receive emails each time they occur. For example, we recommend that you disable the option to receive an alert whenever someone uses the ‘lost password’ function. It’s a relatively standard event, and in most cases, it will only result in spamming your inbox.
The same applies to receiving alerts when an administrator signs in. Depending on the number of administrators your WordPress site has, this can get quite unwieldy, so uncheck that box. Instead, enable the option right below, which notifies you when an administrator signs in from a new device:

In this case, you can quickly assess if an administrator login is out of the ordinary depending on their location and which device they’re using. It’s much more practical than the default setting, and all you have to do is tick a box to enable it.
With that taken care of, we’ve covered all the basic steps to protect your WordPress site using Wordfence Security!
Conclusion
WordPress security is not something to be taken lightly. As great as the platform is, it’s not 100% safe – but as we mentioned earlier, no CMS ever is. However, as long as you take preventive measures and learn the basics of how to protect your WordPress site, you’ll be well ahead of the curve when it comes to security.
If you’re ready to take security into your hands, here’s how to protect your WordPress site using Wordfence Security:
- Install and activate the Wordfence Security plugin.
- Update your login security measures.
- Learn how to execute site-wide scans.
- Set up advanced security alerts.
Is your WordPress site secure? Have you done enough to protect your WordPress site? Share your experience with us in the comments section below.
@themeisle.com