In this step-by-step guide, we’ll show you how to transfer your website to another host or server without downtime.
Here’s a list of steps that we’ll cover:
- Choose a New Web Host
- Create Your Site Backup for Migration Using Duplicator
- Import Your WordPress Site to Your New Host
- Change the Host’s File to Prevent Downtime
- Create a MySQL Database on Your New Web Host
- Start the Duplicator Migration Process
- Update Your Domain
Important: We want to remind you that some web hosting providers offer a free migration service. If you’re not sure whether your hosting provider offers free migration, then ask them first before doing it yourself. If they don’t offer it, then you can go ahead with the tutorial.
But, before we get started on the tutorial, let’s go over why you should move your WordPress site to a new host as well as why you should avoid downtime.
When and Why You Should Move Your WordPress Site to a New Host
- Your Website is Slow:
A slow-loading website is not only bad for SEO, but it also increases the chance of users abandoning your website. In this case, you’d move your WordPress site to a new host to improve your website’s status. - You’re Losing Traffic:
Unplanned downtime during your website’s busiest hours can upset your website visitors and can cause you to lose leads, loyal customers, and revenue. Also, too much downtime can make your search result rankings drop. Switching to a web host that offers an uptime guarantee will ensure you don’t lose traffic or sales. - Your Current Web Host isn’t Right for You:
One of the most common and simple reasons is that your current web host isn’t giving you want. It’s important to choose a web host that provides your website what it needs as well as one that fits in your budget.
Why Should You Avoid Downtime? (Important)
Website downtime isn’t good for either small or big websites. Let’s talk about a few ways a downtime can affect your WordPress site:
Users Will Think You’ve Shut Down – When users visit your website, they want to see it working. If your website is facing downtime, then new visitors may believe it doesn’t exist and the old users may think you’ve shutdown.
Damaged Reputation – Downtime can occur due to many reasons. A technical user may understand it, but not all your users are developers. It’ll create a bad impression of your brand or business with the average visitor.
Loss of SEO Rankings – Your website may rank well in search engines. When your website is down and search engines send their bots to crawl your site, it’ll damage your rankings.
After reading the above, hopefully, you have an idea of why it’s important to have a 24/7/365 website uptime. When moving your website to a new host, you can follow the steps below to avoid downtime and successfully migrate your WordPress website.
Step 1: Choose a New Web Host
Changing your web host is a big decision in itself, so you’ll need to make sure you’ve put enough effort into optimizing your site on your current host before moving to a new one. If it still fails to deliver on speed, security, performance, etc. even after optimizing, then you do indeed need to switch your web hosting.
When choosing a new web host, be aware of the specific features your site needs in its current position and in the future, so you don’t need to change hosts again down the line.
There’re a lot of different types of web hosting such as shared hosting, dedicated server hosting, and managed WordPress hosting.
When choosing a web host, here’s what we recommend:
Shared hosting:
Perfect for those who’re just starting out with a new website and need an affordable hosting solution. Bluehost is the best provider for shared hosting. They’re officially recommended by WordPress.org. IsItWP users get 60% discount along with a free domain name when purchasing a new hosting account.
Get started with Bluehost today!
Dedicated server:
It’s the best solution for users who want to lease the entire server for their sole use and need full control over the server. We recommend InMotion Hosting for dedicated servers. They let you choose the ideal data center for your site and provide free launch assist for 2 hours. InMotion hosting coupon will get you more discounts.
Get started with InMotion Hosting today!
Managed WordPress hosting:
The best choice for WordPress websites that attract high traffic volume. With managed WordPress hosting, you can operate your site on a server that’s uniquely optimized for the security configuration of WordPress. We recommend MangoWP for managed WordPress hosting.
Get started with MangoWP today!
We recommend you to check out these comparisons between Bluehost vs InMotion hosting and Bluehost vs MangoWP
After you buy a hosting plan, don’t install WordPress as you usually would when creating a new site. Just keep it empty and let’s move onto step 2.
Step 2: Create Your Site Backup for Migration Using Duplicator
Go to the admin area of the site you want to move, and install the Duplicator plugin. It’s one of the best WordPress plugins for migrations and backups. If you don’t know how to install a plugin, please refer to our step-by-step guide on installing a WordPress plugin.
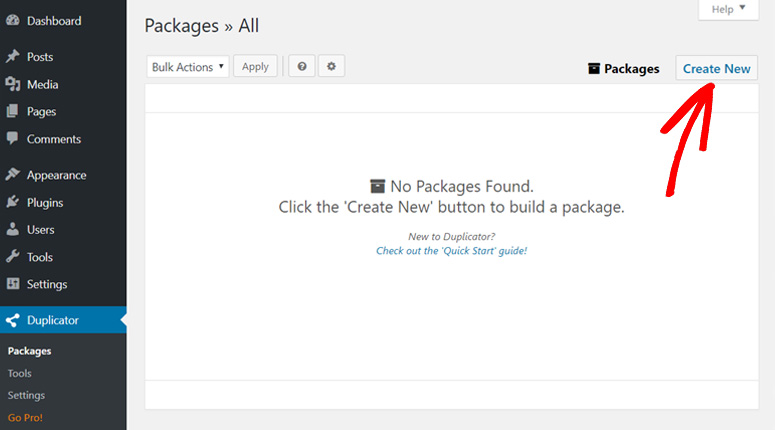
Once you’ve installed the Duplicator plugin, go to Duplicator » Packages in your WordPress dashboard.
Then, click the Create New button in the right-hand corner of the page.
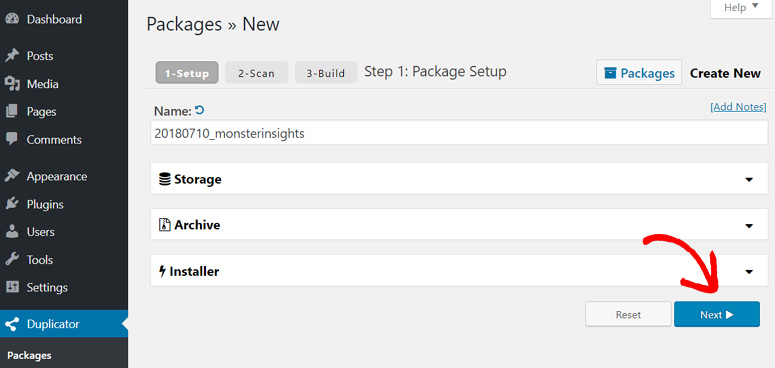
Next, you’ll see a page like the one pictured below. Click the Next button to start the package building process.
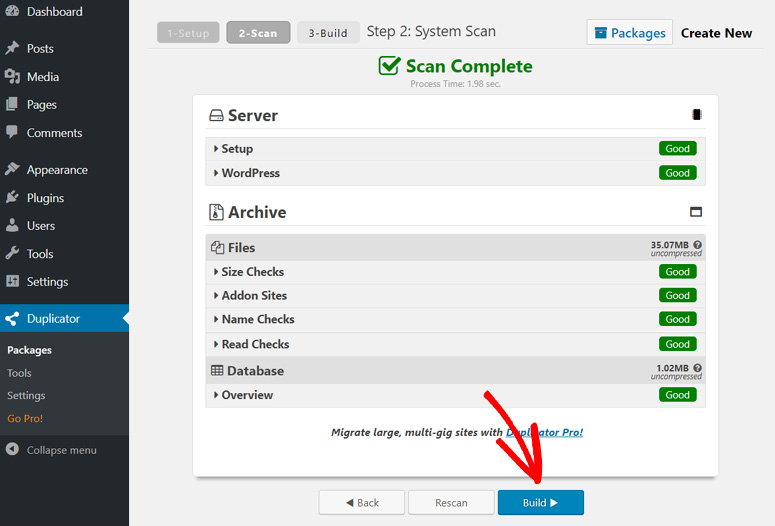
From there, it’ll take you to the second step in the package building process. Make sure that your scan is complete and all the results are Good. Then, click the Build button.
Wait until the process is complete. This may take a while, depending on how large your site is.
Once the process is complete, you’ll see download options for Installer, Archive, and One-Click Download. You’ll need to click on One-Click Download because you’ll need both your Installer and Archive files.
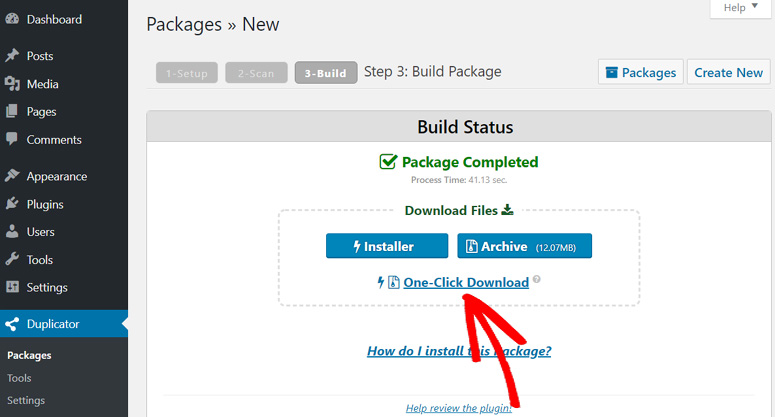
The Archive file is a copy of your site, and the Installer file will help you automatically download the installation process.
Step 3: Import Your WordPress Site to Your New Host
Next, you’ll have to upload the downloaded files (Installer and Archive) to your new web host. In order to do so, you can use an FTP client to connect to your new web host. If you’re new to this, you can follow the instructions given in this step-by-step guide to upload files via FTP to WordPress.
Using your FTP client, upload both the Installer and Archive files to the root directory (usually /username/public_html/ folder) of your website.
Before uploading, you’ll need to ensure that the folder is completely empty. Some hosting companies automatically install WordPress when you sign up. You’ll need to delete it if it’s already been installed by your host.
Step 4: Change the Host’s File to Prevent Downtime
You’ve already uploaded both the installer.php file and archive.zip file to your new web host in step 3, so try to open the installer.php file in your browser.
You can access the file using a URL like this:
But, when you try to access the file, you’ll get a 404 error page because your domain is still pointing to the old host.
This implies that you need to change your domain name servers and point to your new host, but we don’t suggest you do so. If you do, it’ll show your users a broken website as you proceed migration.
That’s why we suggest using an alternative method so users can access your site fully, even during migration.
With this technique, you’ll be able to access your new site using your new domain temporarily on your computer. It’s done with a host’s file on your computer which you can use to map domain names to specific IP addresses.
Now, you’ll add an entry for your domain name in the host’s file so that it points to your new host, but only using your computer. Therefore, you can access your files on your new web host while your users will still be accessing your site from the old host. Hence, there’s zero downtime.
First, you’ll need to find out the IP address of your new web hosting server. To find this, open your cPanel dashboard and navigate to Server Information. There, you’ll see it as Shared IP Address.
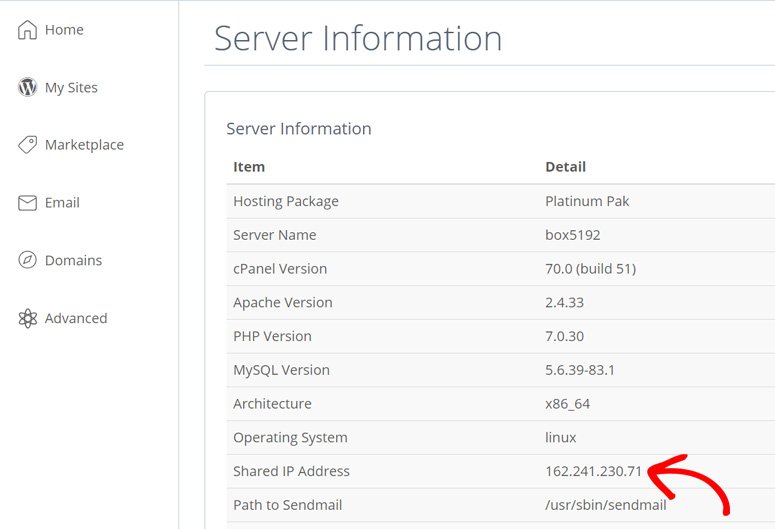
Keep this page open as you’ll need to copy the IP address in a later step.
If you’re using Windows, go to Programs » All Programs » Accessories, right-click on Notepad, and select Run as Administrator. Then, a Windows UAC prompt will appear with 2 options: Yes and No. Click on Yes to launch Notepad with Administrator privileges.
Now on the Notepad screen, go to File » Open and then go to
C:WindowsSystem32driversetc. Select the host’s file and open it.
If you’re using Mac, you’ll need to open the Terminal app and enter this command to edit the host’s file:
sudo nano /private/etc/hosts
Then, both Windows and Mac users need to enter the IP address you copied and your domain name at the bottom of the host’s file like this:
192.168.1.22 www.example.com
Then, save your changes. Now you can now access your site files on the new host using your domain name on your computer.
Note: You’ll need to undo the changes you made to the host’s file after you complete the site migration in step 6.
Step 5: Create a MySQL Database on Your New Web Host
Now, you’re ready to run the installer.php file on your new host but you need to make sure a MySQL database is created before doing so.
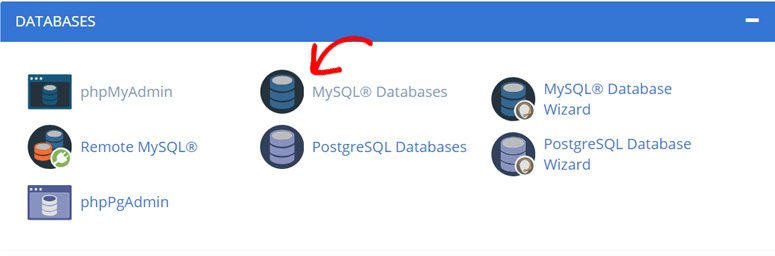
In order to create a MySQL database, go to your cPanel’s dashboard and navigate to the Databases section. Then, you’ll need to click on the MySQL Databases section.
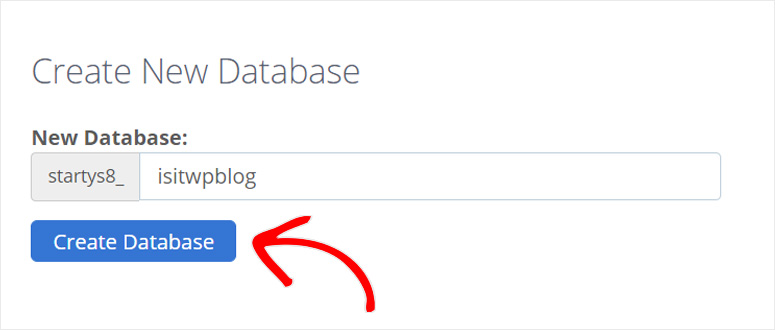
Now, you’ll see a field to create a new database. Type in your database name and click the Create Database button.
After you’ve created a database, scroll down the page to the MySQL Users section. From there, provide a username and password for your new user and then click the Create User button.
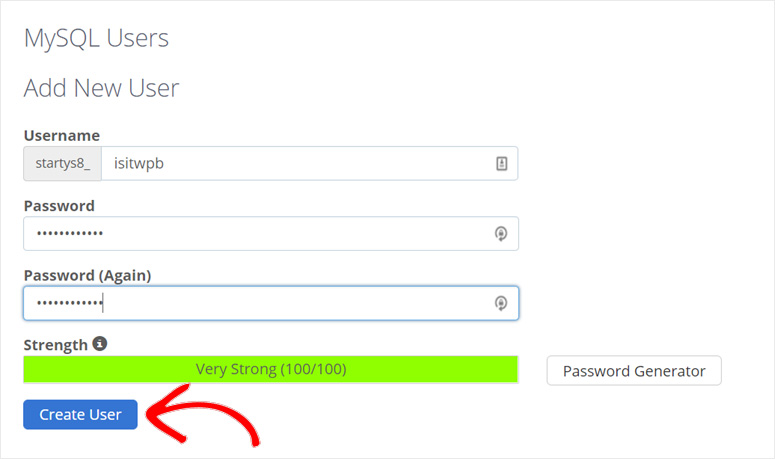
Please take note of the database username and password you just created because you’ll need it in later step.
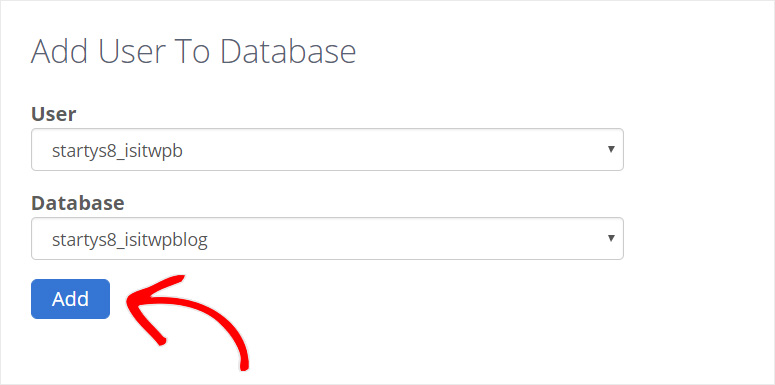
Now, you have to add your user to the database. In order to do this, scroll down to the Add User To Database section and choose the MySQL database and user you just created. Then, click the Add button.
Now, your database is all set to use in your WordPress site.
Step 6: Start the Duplicator Migration Process
Finally, you’re all set to run the Installer file.
So, go to your browser’s address bar and enter the URL as shown below to run the installer.php.
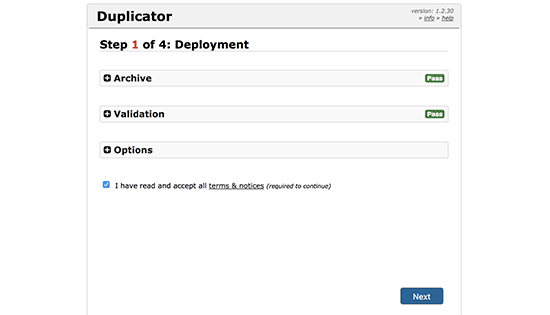
The installer will run a few tests and will show Pass next to archive and validation tests as shown in the screenshot above.
Check the terms and conditions box and then click the Next button.
From there, you’ll see Duplicator’s Step 2 open. You’ll need to enter your MySQL host, database name, username, and password. Insert localhost in the host field and fill in the database details you used in step 5.
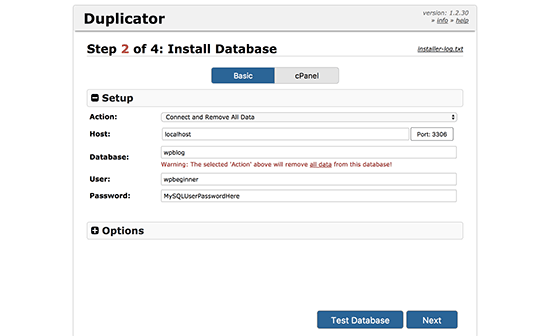
Now, you can click the Next button to continue. But, we recommend you first click the Test Database button to ensure that there’re no database connection errors.
Then, Duplicator will import your WordPress database from the archive.zip file into your new host.
Next, Duplicator’s step 3 will ask you to update the site URL or path, but you don’t need to change anything here as you’re not actually changing it. So, click the Next button to continue.
Duplicator will run the final steps and show the login button in its 4th and final step.
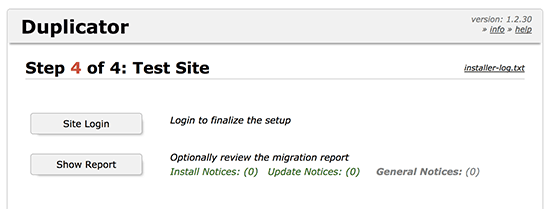
Now, you’ve moved your WordPress site to a new web host completely. So, you can simply log in and check if everything is okay.
Step 7: Update Your Domain
We’ve come to the final step of switching your WordPress site from one web host to a new one.
In the previous step, you added a copy of all your site files to your new host but your domain still points to your old host, so you’ll need to update your domain as well.
In order to do so, you’ll need to switch your DNS nameservers. If your domain was registered with your hosting company, then it’s best to move the domain to the new web host. If it was registered in a domain registrar company like NameCheap, GoDaddy etc., then you’ll need to update your domain nameservers.
Domain nameservers are usually a couple of URLs, like the ones below, that you’ll get from your new web host.
ns1.hostname.com
ns2.hostname.com
The steps to changing domain nameservers differ from one domain provider to another; however, the basic concept is the same. So, we’ll show you how to change DNS nameservers with Domain.com and GoDaddy in this tutorial.
Let’s start with Domain.com.
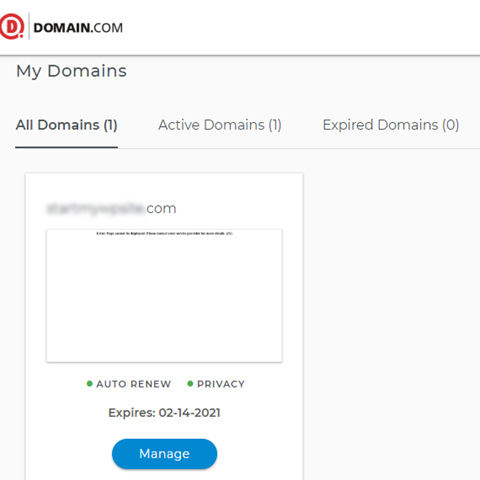
First off, log into your Domain.com account. Find the domain that you want to update and click on the Manage button.
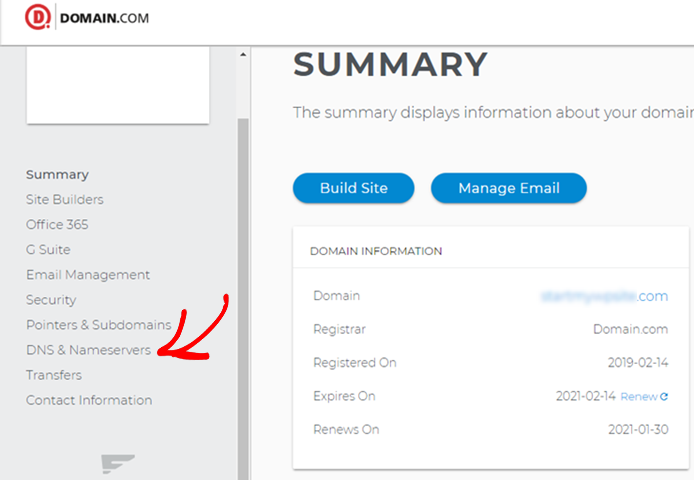
Next, click on DNS & Nameservers.
To change the nameservers, click Edit next to Nameservers.
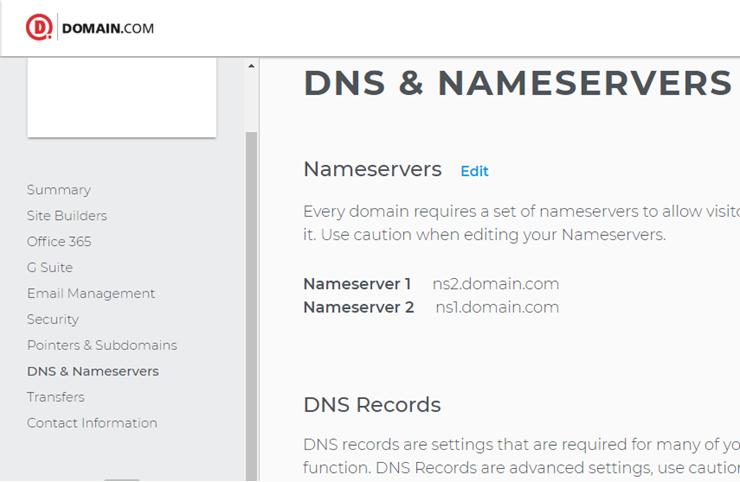
Then, fill in your new nameservers provided by your new web host, and click the Save button.
That’s it!
Similarly, lets’ take a look at how to update nameservers in GoDaddy.
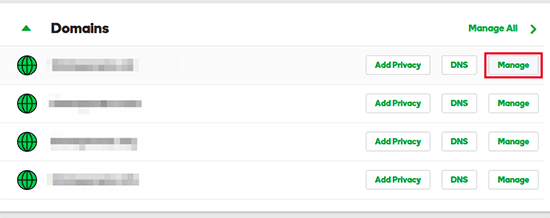
First, log into your GoDaddy account and navigate to Domains. Then, click on the Manage button next to the domain name you want to update.
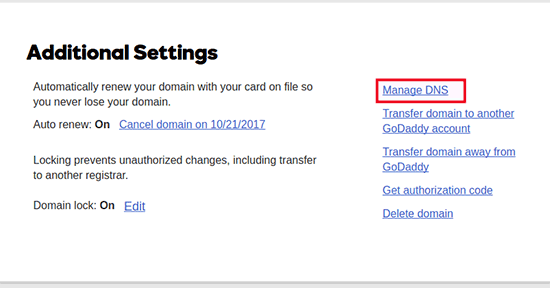
Then, go to Additional Settings and click on Manage DNS.
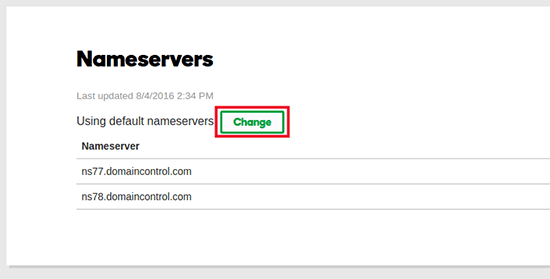
Now, you’ll need to scroll down to the Nameservers section and click on the Change button.
Next, click the dropdown and switch the nameserver type from Default to Custom. Then, fill in your new nameservers provided by your new web host, and click the Save button.
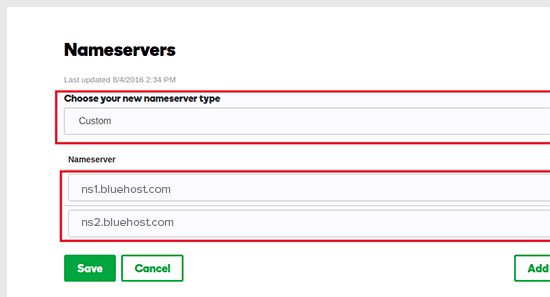
Now you’ve successfully updated your domain nameservers. Unfortunately, it may take 4 to 48 hours to execute these DNS changes.
In the meantime, you’ll now have the same content on both your old host and new host so users will see no difference and the site migration will be seamless without any downtime.
We hope this guide helped you switch your WordPress site from one web host to another with zero downtime.
@isitwp.com