Trying to upload an image but WordPress failed to upload due to an error “Upload: failed to write to disk”? This is a common error which pops up while uploading media in posts/pages. This error can be frustrating for new users. In this article, we will show you how to fix Upload: Failed to write file to disk error in WordPress.
What Causes failed to write file to disk error in WordPress?
This error can occur due to a few reasons. However, the most common reason is incorrect permissions on the directory.
Each file and folder on your website has a set of permissions. Your web server controls access to files based on these permissions.
Incorrect File and Folder Permissions in WordPress may prevent the ability to write files to the disk. This means that your web server cannot create or add new files to this particular folder.
If you try to upload images or any other files from the WordPress admin area, you will get one of the following error messages:
- WordPress failed to write to disk
- WordPress has failed to upload due to an error failed to write file to disk
- Unable to create directory wp-content/uploads/2016/03. Is it parent directory writable by the server?
How to fix WordPress “upload: failed to write file to disk” Error?
First, you need to connect to your WordPress site using an FTP client.
You can use any tool can use FileZilla free FTP client. If you are using some other FTP software it may look a little different.
Once connected, right-click on the wp-content folder and select the file permissions.
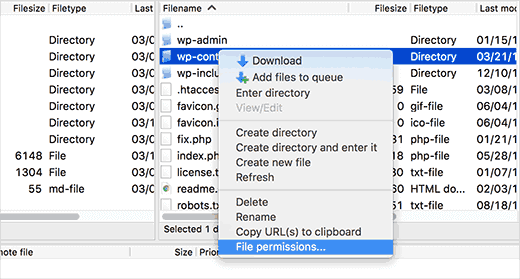
This will open the file permissions dialog box in your FTP client. It will show you file permissions for the owner, group, and everyone.
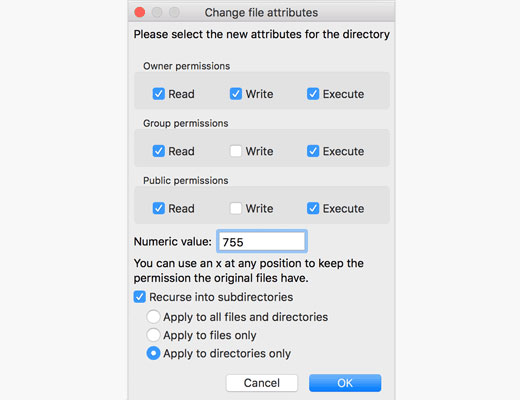
You must enter 755 in the field. After that, check the box next to “Recurse Subdirectories”. Finally, you must click on the option “Apply only to directories”.
Click the OK button to continue.
Your FTP client will now configure folder permissions in 755 and apply it to all wp-content subfolders. This includes the download folder where all your images are stored.
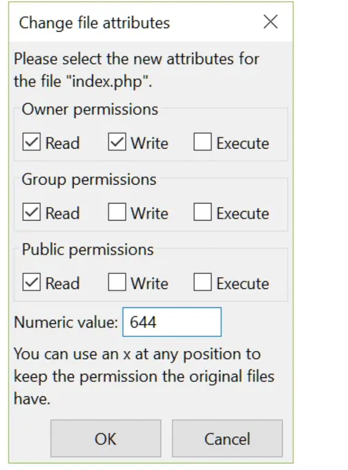
Once again, right-click the wp-content folder and select the file permissions. This time we will change the permissions for the files.
Enter 644 in the numeric value, then check the “Use subdirectories” box.
Finally, you have to click on the option “Apply only to files”.
Click the OK button to continue. Your FTP client will now set file permissions to 644 for all files in the wp-content folder.
You can now visit your WordPress site and try uploading files.
Contact your Web Hosting Provider
If after changing the files permissions you are still having this error; it could simply be that you have to contact your web hosting provider to help then about emptying your temporary file directory. So if your temporary directory is full or not configured correctly; this will make it that we cannot write the file to the disk which will then cause the error to happen. So again you may simply have to contact your web hosting provider if this simple fixes did not work for you.
Conclusion
In this tutorial, we saw how to fix Upload: Failed to Write File to Disk error in WordPress. We hope this guide has been able to help you keep writing the files and multimedia content to your disk from WordPress website.