The image upload issue in WordPress is one of those irritating errors that has no clear solution, meaning it has a number of different causes and a number of different solutions you’ll need to weed your way through.
The most frustrating part of this error is how randomly it occurs, making it almost impossible to predict. It’s not one of those issues you can prepare for by creating a backup of your site prior to making a major or minor change.
However, there are a number of different ways you can resolve this issue, and we’re going to go over 7 different options you have.
Asking Your Host for Help with the Image Upload Issue
If you’re inexperienced with WordPress, you might save yourself some time by asking your host to correct this issue for you. They may not be able to do anything, but it’s still worth asking in case they’re able to correct the issue swiftly.
If you are not able to resolve the issue with the help of your host, proceed.
Does the Image Upload Issue Occur for All Images or One Image?
The solution you use to correct this problem depends on whether the image upload issue is occurring for all of the images you upload (including the ones already in your media library) or just one image.
We’ll go over each solution below, but here are two lists of solutions you can take for either scenario.
If the image upload issue occurs with all images:
- Change file permissions.
- Deactivate plugins, especially plugins that optimize images.
- Increase your site’s PHP and WordPress memory limits.
- Remove the file path on the Media Settings page.
- Check to see if the PHP version you’re using is causing issues.
If the image upload issue occurs with just one image:
- Rename the image.
- Decrease the image’s resolution.
Solution #1: Change File Permissions to Fix the Image Upload Issue
You’ll need to use an FTP client or access your host’s control panel for this solution. When your host makes updates on your server, they may affect your site’s file permissions, causing the image upload error to appear.
These instructions refer to FileZilla, a popular FTP client, so follow along carefully if you plan to use your host’s control panel or a different FTP client.
Access your site’s files, and open your site’s root directory, typically called public_html. Open the wp-content folder. This is where the Uploads folder is located. The Uploads folder contains additional folders that store your media files when you upload them to your site.
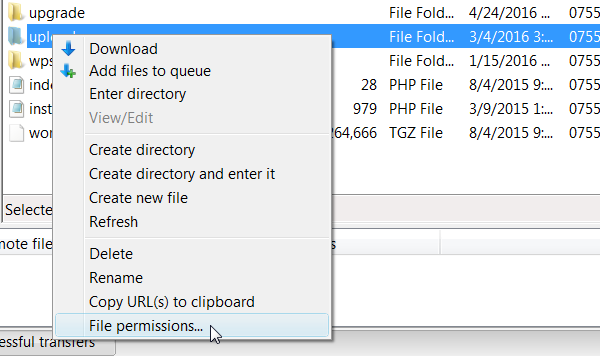
Right-click the Uploads folder, and select File Permissions. Make note of the numeric value that’s already there.
In the Change File Attributes window, change these settings:
- Numeric Value: 744
- Recurse into Subdirectories: Tick.
- Select the Apply to Directories Only radio button.
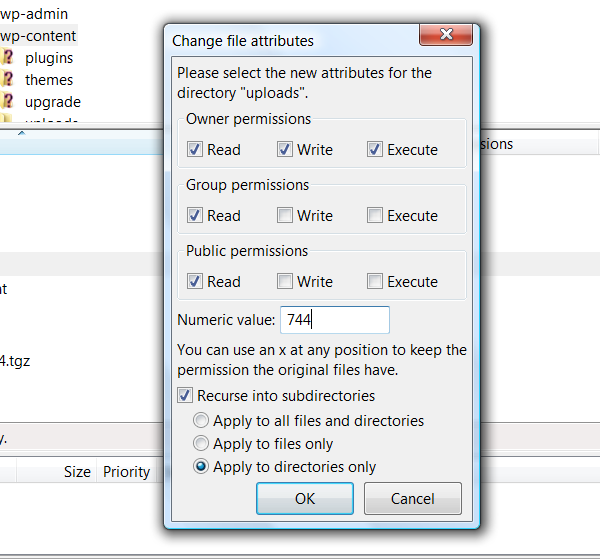
Click OK once you’re done. Repeat the steps and change the 744 to 755 if it didn’t work for you. Right-click the Uploads folder and select File Permissions if it didn’t work. Enter the original numeric value that was there when you started, and continue to the next solution.
Solution #2: Deactivate All of Your Plugins
If you use a plugin to optimize your images, try deactivating it before uploading images to see if that fixes the image upload issue for you. Try deactivating all of your plugins if not. If your site has grown quite a bit and uses a lot of plugins, you may be reaching its memory limits, which may prevent you from uploading media files.
Continue to the 4th solution if deactivating your plugins did not work for you. Find a new image optimization plugin if deactivating your current one fixed the issue for you, or contact the developer directly to see if they have a solution. Continue to the next solution if deactivating all of the plugins worked for you.
Solution #3: Increase Your Site’s Memory Limit
It’s possible your site has grown to the point where you’re reaching its WordPress and PHP memory limits, as stated in the previous solution. This is especially true if your site runs on a shared hosting server as shared hosts often put strict limits on the amount of memory its users are allowed to use.
If you are on a shared hosting server, you may have a tough time increasing your site’s memory limit yourself and may need to ask your host to do so for you. We’ve created an entire post explaining how to increase your memory limit in WordPress.
It requires accessing your site through an FTP server, editing your files and adding code to them, so be prepared to do all of that if you’re still new to WordPress and building websites.
Solution #4: Remove the File Path from the Media Settings Page
This isn’t a popular solution to the image upload issue, but it has worked for some. Sign into the admin area of your WordPress site, open the Settings menu, and select Media. If you see a file path with a textbox displaying where the files should be uploaded to, delete the text in the file path textbox, and click Save Changes once you’re done.
If you open the Media Settings page and only see dimensions for images and a setting that says your files should be organized into month/year folders, you won’t find any use with this solution.
Solution #5: Change the PHP Version You’re Using
WordPress is developed with PHP, a server-side scripting language. PHP has its own updates similar to how WordPress, your plugins and theme need to be updated. WordPress requires PHP version 5.2.4+ at the bare minimum, though it recommends PHP 5.6 or later, as of May 2016.
Some users have been able to fix the image upload issue by upgrading to the latest version of PHP or downgrading to a previous version of it. You can do this in cPanel by selecting PHP Config under the Programming, Software/Services or Advanced sections.
If you’re a novice WordPress user, enlist the help of your host to make sure it’s okay for you to change your PHP version as the change could potentially break your site. Backup your site at the very least, especially your .htaccess file.
All you need to do is select a different PHP version in PHP Config, and save your changes.
Solution #6: Fix the Image Upload Issue by Renaming Your File
If you’re experiencing this issue with one image, your solution may be easier than the previous solutions. Try renaming the file on your computer prior to uploading it to WordPress to start out with. Make sure there are no apostrophes in your file names as this tends to cause this error to appear.
Make sure your file names are written in all lowercase letters. Try changing the file type if it still doesn’t work, such as turning a .jpg file into a .png file and vice versa.
Solution #7: Optimize the Image Before Uploading it to Your Site
Uploading images that are larger than you need them to be causes a variety of different issues, among them being this image upload issue. It can also cause you to hit your site’s memory limit quicker than it should have.
A good rule of thumb to follow is to never upload a regular blog post image that’s wider than your content width, unless it’s a featured or header image. A simple way to figure out your content width is to open any blog post on your site, right-click anywhere within it, and select Inspect Element.
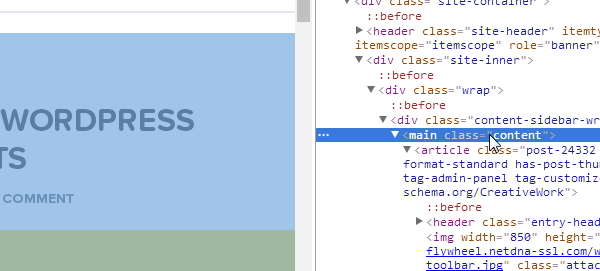
Click each arrow to open more of the code until you find a class called “content.” Hover over that class once you find it. It should highlight the content area of your post. Once it does, it’ll display the width of your content area in a small, yellowish pop-up box.
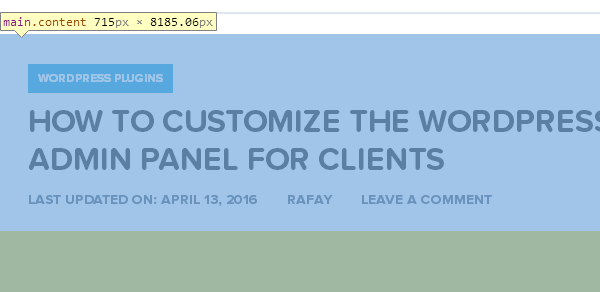
Try to keep your images at or below this width. You can also pick a maximum file size to optimize your images even more. Most sites stick to a 100 KB maximum file-size rule and optimize their images based on that number prior to uploading them to WordPress.
If you want a quick way of seeing if this is the issue, resize the image in Photoshop or GIMP, and re-upload it to your site.
Final Thoughts
This is a mysterious issue to have on your site, and many WordPress users state they were unable to fix their own issues even after following all of these steps. If you can’t figure this one out and you still have yet to contact your host, do so as soon as possible. They may have a quick and simple solution for you.
If you are not an experienced developer or WordPress user, you may need to go as far as hiring a developer @mango-wp.com to take a look at your site for you as there may be an issue with your code that’s uncommon and specific to your site.
@fancythemes.com