WordPress, for all its qualities that allow you to design a web presence with ease, still has difficulties in certain areas. One of the problematic issues is the use of SMTP to send emails. This is especially troublesome if you are selling items via the WooCommerce platform plugin or simply need to communicate with customers, members or users on a regular basis.
There are many third-party solutions available to help with this problem such as Mailgun or Google Apps, but these are paid apps, and not everyone has the resources to dedicate to such solutions.
The WordPress issue
WordPress uses PHP as a backbone to its system, and many hosting providers have this PHP installation misconfigured, or even disabled, with a view to the security of their customers. This is the crux of the issue. WordPress emails will not be delivered if the hosting provider has blocked them. Even so, WordPress is using the default PHP’s mail() function to send emails, which is often not properly configured and will land in the Spam folder most of the time.
The solution
Instead of using PHP to send emails, SMTP is a far better alternative. SMTP stands for Simple Mail Transfer Protocol and is what facilitates the process once you have clicked Send.
In order to use your own domain with WordPress and SMTP, you will need to install the WP Mail SMTP plugin.
Once installed, navigate to “Settings -> WP Mail SMTP” in the menu on the left of your WordPress administration dashboard.
Enter the email address you want to use, usually “something@mydomain.com,” and add the name that you want to use for sending. This will be what people see when they receive your message.
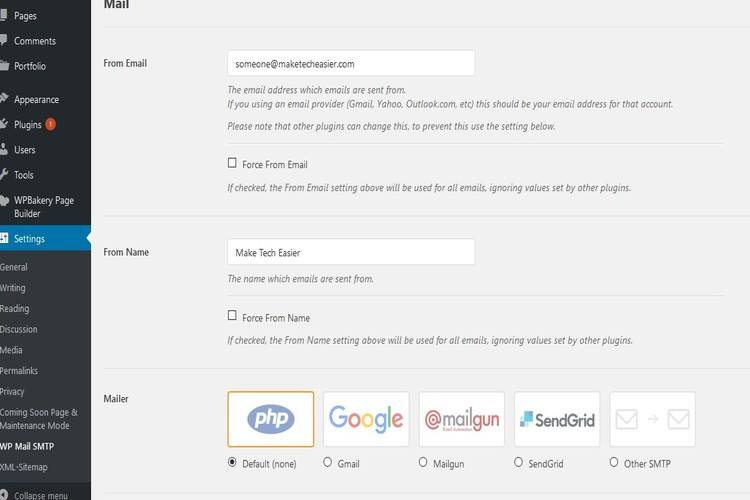
Next, you need to scroll to the bottom where the Mailer options are. Click “Other SMTP,” which will reveal the further settings seen below.
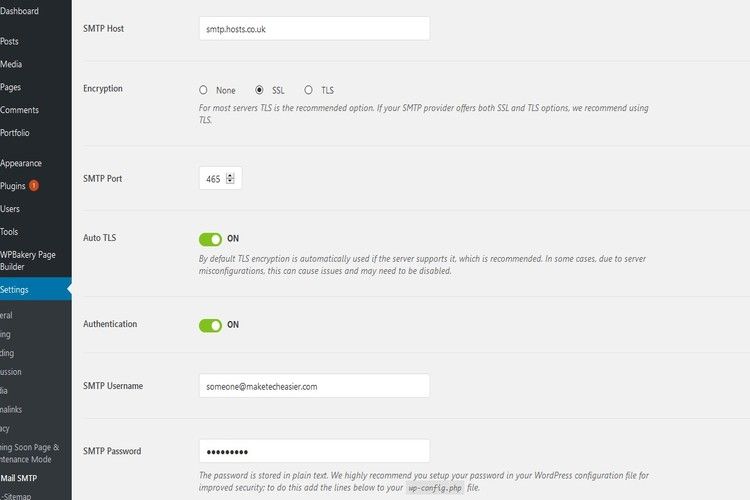
- Enter the SMTP host details, encryption type, and the port number. Typically, the host will be something like “mail.yourdomain.com;” however, it can be different. Mine shown above is “smtp.hosts.co.uk.”
- The encryption will depend on your host’s setup. If your host has enabled this, then SSL is the bare minimum to use, and ideally, TLS should be used.
- As for ports, the selection is based off the encryption type. Port 456 is for SSL, and Port 587 is used for TLS, otherwise it is Port 25, if no encryption is used.
Finally, if it is required, use the slider button where it says “Authentication” to enable you to enter the Username and Password. If you are unsure of these details, then your web hosting provider can give you them, or they will perhaps be within your host’s Admin Control Panel.
Click the Save button at the end of the Settings once you are satisfied everything is correct.
Testing
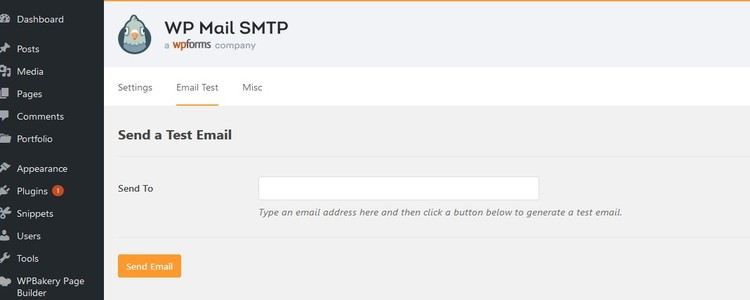
You can test the settings by clicking the “Email Test” tab. Enter the email address which will receive the test email and click “Send Test.” If it is successful, you have correctly configured the plugin and are ready to send emails from WordPress.
Additional Settings
This is optional but recommended. The password you enter into the plugin is kept in “plain text,” which means anyone can read it. You can see the text below the Password field as shown in the following image.
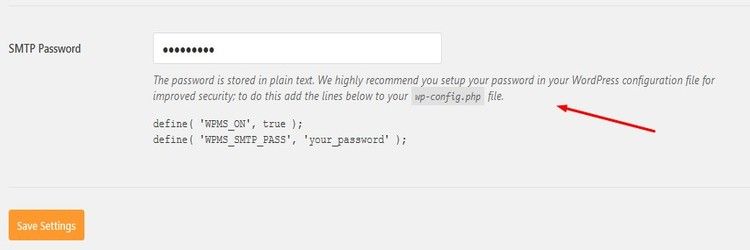
You need to edit your wp-config.php file which is located in the root directory of your WordPress install. Remember to back up the file before making any changes.
Locate the line that says, “That’s all, stop editing! Happy blogging” and add the following code just before it.
define( 'WPMS_ON', true );
define( 'WPMS_SMTP_PASS', 'your_password' );
Change “your_password” to your actual password and save.
Troubleshooting
If you find that your emails still won’t send, then check the port numbers and the details entered. Most of the time it is a combination of the encryption used and the port number. Your hosting provider or email provider should be able to assist further.
AffiliateLabz
Great content! Super high-quality! Keep it up! :)
Mango Support
Thank you.