WP-config is one of the most powerful files on your WordPress site, and it plays an important role in how WordPress works behind the scenes. There are some very useful WordPress configuration tricks that most beginners don’t know about. In this article, we will share some of the most useful WordPress configuration tricks that will help you troubleshoot, optimize, and secure your WordPress site.
How to Use these WordPress Configuration Tricks?
WordPress comes with a powerful configuration file called wp-config.php. It is located in the root folder of every WordPress site and contains important configuration settings.
To learn more, see our guide on how to edit wp-config.php file in WordPress.
All the best WordPress hosting companies come with 1-click WordPress installation which means you would never need to edit the wp-config.php file during the installation. This is the main reason why many users are not familiar with the power of this file.
You can use the wp-config file to troubleshoot, optimize, and secure your WordPress site.
The wp-config.php file is a powerful tool, and a tiny mistake in the code can make your website inaccessible. You should only edit this file when necessary and always create a complete WordPress backup before making any changes,
That being said, let’s take a look at some handy WordPress configuration tricks that you can use on your website.
#1 The Basic WordPress Configuration Settings
By default, you just need to fill in the database settings during WordPress installation. If you don’t have a wp-config.php file present, then you will be asked to create one by filling in your database information.
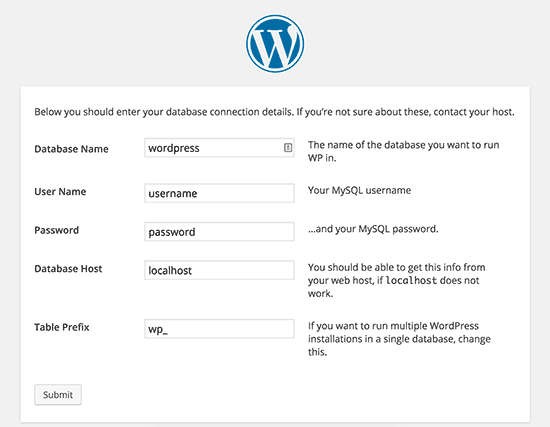
WordPress will try to automatically save these settings by generating a wp-config.php file. However, if it fails, then you will need to add them manually.
To do that, you will need to connect with your website using an FTP client. Once connected, you will need to rename the wp-config-sample.php file to wp-config.php.
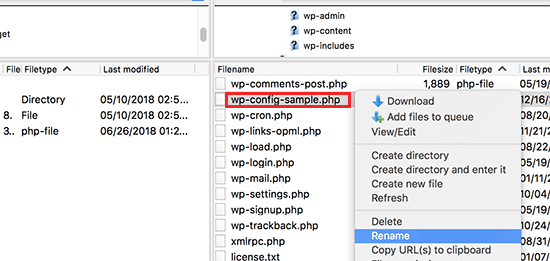
After that, you can go ahead and edit the newly created wp-config.php file. You will need to add your database information by changing the following lines:
define('DB_NAME', 'database-name');
 define('DB_USER', 'database-username');
 define('DB_PASSWORD', 'database-password');
 define('DB_HOST', 'localhost');
Don’t forget to save your changes and upload the file back to the server.
#2 Adding Security Keys in WordPress
The default WordPress installation automatically adds security keys to your configuration file. These security keys are used to add an extra security layer to your WordPress login and cookie authentication.
You can always regenerate security keys if you feel someone may be accessing your website without proper authentication. Changing security keys will log out all logged in users.
define( 'AUTH_KEY',         'put your unique phrase here' );
define( 'SECURE_AUTH_KEY',  'put your unique phrase here' );
define( 'LOGGED_IN_KEY',    'put your unique phrase here' );
define( 'NONCE_KEY',        'put your unique phrase here' );
define( 'AUTH_SALT',        'put your unique phrase here' );
define( 'SECURE_AUTH_SALT', 'put your unique phrase here' );
define( 'LOGGED_IN_SALT',   'put your unique phrase here' );
define( 'NONCE_SALT',       'put your unique phrase here' );
For more information, see our article on WordPress security keys and how to use them.
#3 Change WordPress Table Prefix
A typical default WordPress installation adds a wp_ prefix to all WordPress database table names. Some WordPress security experts believe that changing the table prefix can make your WordPress database more secure.
To do that you, need to change the following line in your WordPress configuration
$table_prefix = 'wp_';If you are doing this for an existing website, then you will also need to change the table prefix in your WordPress database. To do that, see our article on how to change the WordPress database prefix.
#4 Turn on Debugging in WordPress
WordPress comes with a neat debugging feature that allows you to see or hide WordPress errors when in debug mode. To turn this on, you will need to add this rule in your WordPress configuration file.
define( 'WP_DEBUG', true );You can also turn on debugging while hiding the errors on your website and saving them in a log file instead. To do that, add the following lines to your configuration settings.
define( 'WP_DEBUG', true );
define( 'WP_DEBUG_LOG', true );
define( 'WP_DEBUG_DISPLAY', false );
This will create a debug.log file inside wp-content folder of your website and store all debugging errors and notices inside the log file.
#5 Changing Your Site or WordPress Address
Normally, you can set your WordPress and Site URLs from Settings » General page. However, you may not be able to do that if you don’t have access to your WordPress site, seeing redirect errors, or have just moved your site.
In that case, you can change your site and WordPress URLs via wp-config.php file by adding the following lines:
define('WP_HOME', 'http://www.example.com');
define('WP_SITEURL', 'http://www.example.com');
Don’t forget to replace example.com with your own domain name.
#6 Override File Permissions
WordPress allows you to override file permissions if your host has restrictive permissions for all user files. Most users do not need this, but it exists for those who need it.
define('FS_CHMOD_FILE', 0644);
define('FS_CHMOD_DIR', 0755);
To learn more about file permissions, see our article on how-to fix file and folder permissions error in WordPress.
#7 Changing Post Revision Settings
WordPress has a very useful a post revisions feature which allows you to undo changes to your posts and pages by reverting back to a previous version or an autosave.
You can disable or change post revision settings through the configuration file. Here are different post revision settings that you can use.
You can change how often WordPress stores an autosave as a revision by adding the following line:
define('AUTOSAVE_INTERVAL', 120); // in secondsSome articles on your site may have dozens of post revisions depending on how long it took to write them. If you think that feature annoys you, then you can limit the number of revisions per post.
define('WP_POST_REVISIONS', 10);If for some reason, you want to disable the post revisions feature altogether (not recommended at all), then you can use the following code to disable post revisions.
define( 'WP_POST_REVISIONS', false );#8 Changing WordPress Trash Settings
WordPress comes with a recycle bin feature called Trash. When a user sends a post to trash, it is still stored on your website for next 30 days as trash. After that time, WordPress automatically deletes them forever.
You can change this behavior by changing the number of days you want to keep the trash.
define( 'EMPTY_TRASH_DAYS', 15 ); // 15 daysIf you do not like this feature, then you can disable it by adding the function below:
define('EMPTY_TRASH_DAYS', 0 );Note: Using zero means your posts will be deleted permanently. WordPress would not ask for confirmation when you click on Delete Permanently. Any accidental click could cost you…
To learn more, see our article on how to limit or disable automatic empty trash feature in WordPress.
#9 Adding FTP/SSH Constants to WordPress Configuration
By default, WordPress allows you to upgrade WordPress core, themes, and plugins from the admin dashboard. There are some hosts that require an FTP or SSH connection everytime you try to upgrade, or install a new plugin.
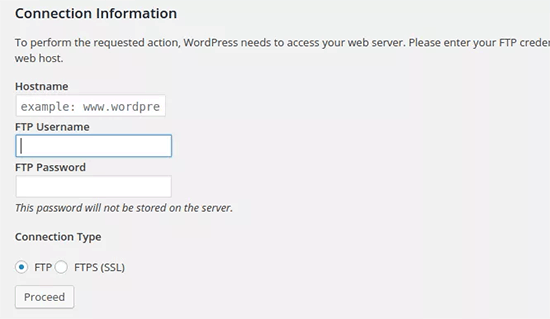
By using the codes, you can set the FTP or SSH constants and never have to worry about it again.
// forces the filesystem method: "direct", "ssh", "ftpext", or "ftpsockets"
define('FS_METHOD', 'ftpext');
// absolute path to root installation directory
define('FTP_BASE', '/path/to/wordpress/');
// absolute path to "wp-content" directory
define('FTP_CONTENT_DIR', '/path/to/wordpress/wp-content/');
// absolute path to "wp-plugins" directory
define('FTP_PLUGIN_DIR ', '/path/to/wordpress/wp-content/plugins/');
// absolute path to your SSH public key
define('FTP_PUBKEY', '/home/username/.ssh/id_rsa.pub');
// absolute path to your SSH private key
define('FTP_PRIVKEY', '/home/username/.ssh/id_rsa');
// either your FTP or SSH username
define('FTP_USER', 'username');
// password for FTP_USER username
define('FTP_PASS', 'password');
// hostname:port combo for your SSH/FTP server
define('FTP_HOST', 'ftp.example.org:21');
Note: Don’t forget to replace the WordPress path and ftp.example.com with your own FTP Host information.
#10 Allow Automatic Database Repair
WordPress comes with a built-in feature to automatically optimize and repair WordPress database. However, this feature is turned off by default.
To enable this feature you need to add the following line to your WordPress configuration file.
define('WP_ALLOW_REPAIR', true);After adding this, you need to visit the following URL to optimize and repair WordPress database
Don’t forget to replace example.com with your own domain name. You will see a simple page with the options to repair or repair and optimize the database. You don’t need to be logged in to access this page.

#11 Increase PHP Memory Limit
Some of the most common WordPress errors are caused by PHP memory exhausted. You can increase the PHP memory limit through wp-config.php file. Simply paste the code below:
define('WP_MEMORY_LIMIT', '128M');#12 Moving wp-content Directory
WordPress allows you to move your wp-content directory. Some experts believe that it can help strengthen WordPress security.
You will need to add the following code to your wp-config.php file:
define( 'WP_CONTENT_DIR', $_SERVER['DOCUMENT_ROOT'] . '/blog/wp-content' );
define( 'WP_CONTENT_URL', 'http://example/blog/wp-content');
define( 'WP_PLUGIN_DIR', $_SERVER['DOCUMENT_ROOT'] . '/blog/wp-content/plugins' );
define( 'WP_PLUGIN_URL', 'http://example/blog/wp-content/plugins');
Don’t forget to replace example.com with your own domain name.
#13 Use Custom User Tables
By default, WordPress saves all user data in the tables wp_users and wp_usermeta. By using the function below, you can specify the table where you want your user information stored.
define('CUSTOM_USER_TABLE', $table_prefix.'my_users');
define('CUSTOM_USER_META_TABLE', $table_prefix.'my_usermeta');
#14 Enable Multi-Site Network
Each WordPress site comes with a built-in multisite feature which allows you to create multiple WordPress sites using the same installation. To learn more, see our complete guide on how to install and setup WordPress multisite network.
You can enable multisite functionality by adding the following line to your WordPress configuration file:
define('WP_ALLOW_MULTISITE', true);#15 Securing Your WordPress Configuration File
As you can see, the wp-config.php file contains really important WordPress settings. By default it is located in the root WordPress folder, but you can move it. It can be moved outside your public_html directory, so users cannot access it. WordPress knows by default to look in other directories if the files is not found in the WordPress root folder.
You can also add the following code to your .htaccess file to limit access to this file.
# Protect wp-config.php
<Files wp-config.php>
    order allow,deny
    deny from all
</Files>
We hope this article helped you learn some useful WordPress configuration tricks that you didn’t know. You may also want to see our mega list of 55+ most wanted WordPress tips, tricks, and hacks that you can use on your site.
@www.wpbeginner.com