It is a common known fact that Joomla is a good platform for a certain type of website, but WordPress is always the best. It is easy to customize websites in WordPress without much of technical knowledge, and one can enhance functionalities and features with free and premium plugins. The following article will help you perform Joomla to WordPress migration easily step by step.
Steps to move your site from Joomla to WordPress
Step 1: Setup WordPress
You need to install WordPress. The first thing you need to do is to buy web space from a popular web host and install WordPress in the provided space. Most of the web hosts have one-click installation option to install and configure WordPress account
Step 2: Install Plugin FG Joomla To WordPress
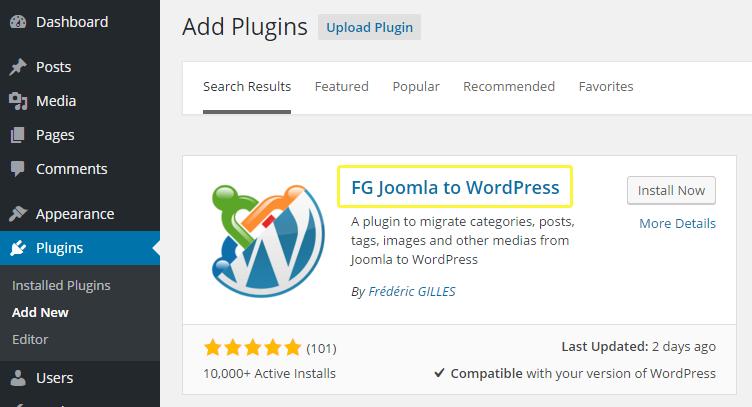
Then, go to the WordPress admin area and install FG Joomla to WordPress plugin. For that, go to the left menu on the Admin Dashboard. Place your mouse pointer on Plugins and click on Add New. Search the plugin by its name and click on Install and then click on Activate button.
Step 3. Website and Database Parameters
After the activation, go to Tools > Import to see the list of import tools available for your WordPress website. Click Joomla (FG) from the list.
You will be taken to a new page called Joomla Importer WordPress page. Here you will see a lot of fields where you have to provide all the required information of your existing Joomla website and database information. Therefore, make sure you get all the correct information for a smooth Joomla to WordPress migration.
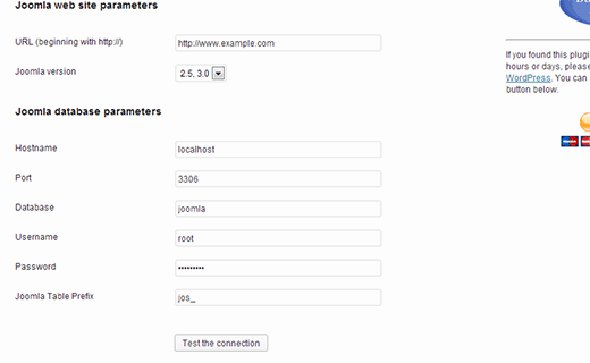
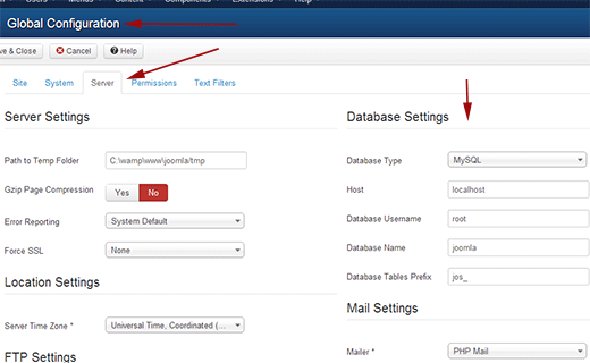
You can find your Joomla database information in the configuration.php file in the root folder of your Joomla website. To access this file, use an FTP client. Open configuration.php in a text editor (for example, Notepad).
You can also get the FTP settings from Global Configuration> Server as state below.
Step 4: Importing Posts and Media Files
Scroll to “Behavior” after you provide your database information. Make sure that you’ve checked Force media import option, if you want to import any media files from Joomla to WordPress. When finished, click “Import content from Joomla to WordPress”.
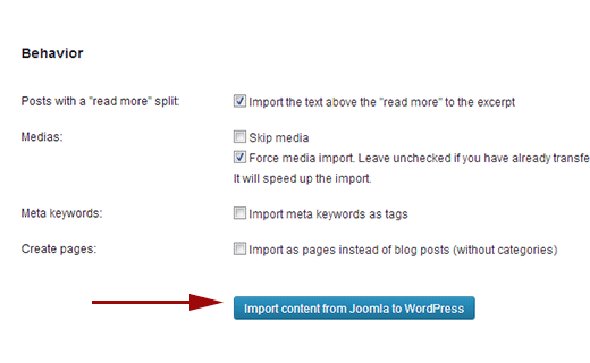
The plugin will import your content to WordPress. The import process may take a while depending on how much content and how many media files have to be transferred. When it is completed, you’ll get a notification like how many categories, posts, media files or other items imported.
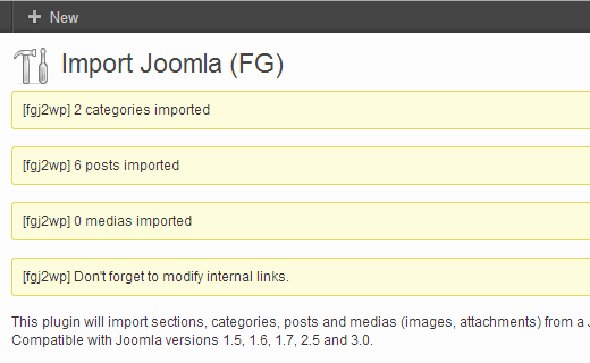
Step 4. Modifying Internal Links
Once all the Joomla to WordPress migration are done, you should fix all broken internal links.
Internal links have to be modified because you might have a different domain name and the permalink of the WordPress site may not be similar to what you had in your Joomla site.
Click on Modify internal links at the bottom of the Joomla (FG) importer page.

Problem solving
The most common problem during the import is “Fatal error: Allowed memory size of bytes exhausted”. In such a case, you have to increase PHP memory which could be shorter by default depending on your web hosting plan.
Connect FTP with your web server and spot the file wp-config.php under the root folder of your WordPress site. All you need to do is to paste the following line of code in that file and save it.
define( ‘WP_MEMORY_LIMIT’, ‘256M’ );
Another common error is the database connection error. Make sure you are using correct login credentials and recheck your database settings. If everything is ok, take a backup of your database because the following operation can make the database corrupt or sometimes, it is useful to extract the tables which do not get migrated. Open wp-config.php in the same way as the above using FTP and edit the file. Insert the following code and save the file. Clear the cache of the browser and start the operation of transferring database once again.
define(‘WP_ALLOW_REPAIR’, true);
Conclusion
We hope that those pieces of advice will be useful for you to transfer your website from Joomla to WordPress. If you want Joomla to WordPress migration are error-free and efficient, then contact MangoWP right away with 100% Free.